Introduction
Ownership of your information asset is substantially more flexible and secure if your assets are stored on YOUR HARDWARE at your home or in a place where you can get to without needing a passport.
The big techs have such high stock market valuations because they own the hardware that processes and stores your information, Home Station is about processing and storing information on your OWN HARDWARE – so you can transfer some of their sky high valuations back to you!
Home Station
Home Stations can be used to process and store your private information, you can also use it to run Fiduciary Exchange software.
The Fiduciary Exchange software is a free download and can run on any Ubuntu 20.04 x86 Server environment. You can install that Ubuntu environment on:
-
Most spare machines you have with Linux, Windows or macOS operating systems, as a virtual machine (the free and open-sourced virtualbox is recommended but others will also work, in fact even containers like LXD will work).
-
Any hosting provider that supply x86 virtual machines e.g. Amazon, Microsoft, Vultr etc. Normally only cost a few Australian dollars a month!
-
If you do NOT have any spare hardware and you do NOT want to use hosting providers, you can buy or built your own hardware.
LATEST UPDATE
The following procedures for Option 3 are TOO COMPLEX and SLOW, so we are now doing our own cases instead of using off-the-shelf Raspberry Pi and Odriod Cases.
Besides giving our users a faster tool-less assembly process, having our own cases also mean we can now place the circuit boards vertically, substantially improving the thermal performance of the whole system.
Of course you are free to use whatever case you like and source any of your hardware from anywhere you like, this is just an extra option for those who want to use a "reference" case.
If you have ideas for the cases which you think can benefit OTHERS also, send your designs in and we will have a look, we may be able to do some free prototypes for you.
Note we are still keeping the flat-pack shipping and self-assembly concept of Option 3, we are just tuning the process to reduce some pain points.
Option 3 is much harder than the other 2 options, but the knowledge and skills you gain will be invaluable in building up the information technology capability and infrastructure of your country.
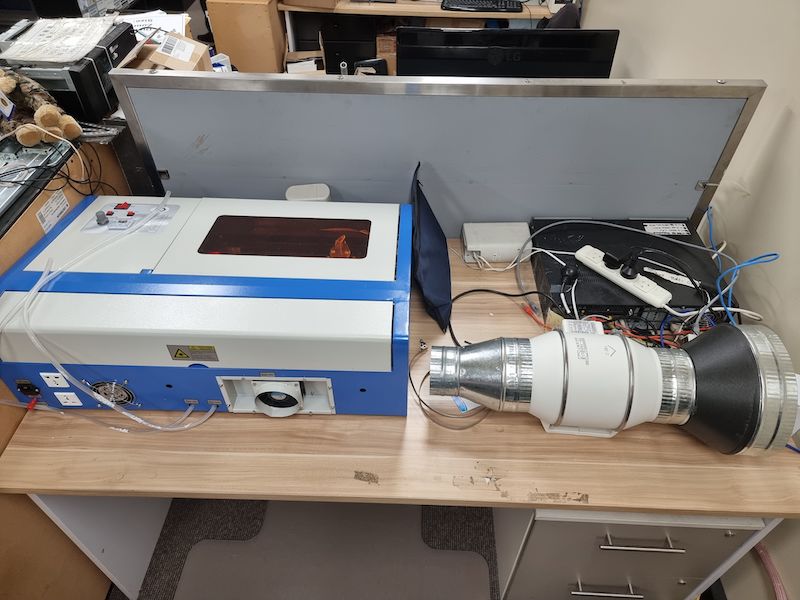
The laser cutter and the exhaust fan for prototyping new cases ourselves have arrived!
Option 3
Home Station A
- 1 x Raspberry Pi 4B
- 1 x 2G RAM
- 1 x 64G Samsung U3 microSD
- 1 x laser cut acrylic case
Home Station B
- 1 x Raspberry Pi 4B
- 1 x 8G RAM
- 1 x 64G Samsung U3 microSD
- 2 x 500G Samsung USB3 T5
- 1 x 4T Seagate USB3
Home Station C
- 1 x Odroid H2+
- 32G RAM
- 1 x 64G Samsung U3 microSD
- 2 x 500G Samsung SATA SSD
Home Station A
Price Guarantee
Since we subsidise the Home Station, we do not believe you are going to buy equivalent Home Station components cheaper than the price here.
By "equivalent" we mean same hardware/components sourced from official Australian distributors with proper warranty.
If you are the first person to show us a way of buying the same items for less, we will give you a Home Station A for free!
Hardware Buyback
If you do NOT want your Home Station anymore and you have not damaged it, you can apply for us to buy it back from you.
After approval please sent it back within 7 days of approval, if we received it in good condition, we will pay you:
$68 if it is within 12 months of your purchase
$48 after 12 months.
We will either donate the returned Home Station to people who cannot afford it or sell it as pre-loved stock by adding $10 on top of the buy price we paid you.
We will NOT buy back hardware not sold by us.
Technical Support
Support at discuss.contacttrace.com.au is free.
Individual Phone or Web Meeting Support is $33 per 20 minutes or part there of, you need to have at least that amount in your credit balance before we will provide support.
Home Station A Alternative Uses
If you would not like to use the Home Station for contact tracing and you do not want to sell it back to us …
- The Home Station is just a standard Raspberry Pi 4B, which means you can use it for millions of things!
- The Home Station will also be able to run other crowd-owned applications (e.g. health, email, calendar, addressbooks etc.) that are planned to be released in 2021. device.
Home Station A Components
- Computer: https://www.raspberrypi.org/products/raspberry-pi-4-model-b/
- Power Supply: https://www.raspberrypi.org/products/type-c-power-supply/
- Case: https://www.farnell.com/datasheets/2865098.pdf
- Storage: https://shop.westerndigital.com/products/memory-cards/sandisk-ultra-uhs-i-microsd
- Software: https://web.contacttrace.com.au/software
TYpe
https://www.raspberrypi.org/documentation/hardware/raspberrypi/revision-codes/README.md
For those worried about Chinese spying hardware, the Computer (actually even the Case) is made in the United Kingdom. Software is developed in Australia and opensourced.
As the volume picks up, we should really talk to the Raspberry Pi Foundation about building a factory here to supply the Australian and Asia Pacific markets. They never manufacture fast enough to meet demand, the Zero W and 4B 8G models ALWAYS run out!
How cool it will be if the public don’t just own the computers they process their information on, but also the factory that makes those computers. It will bring new meaning to crowd-owned computing!
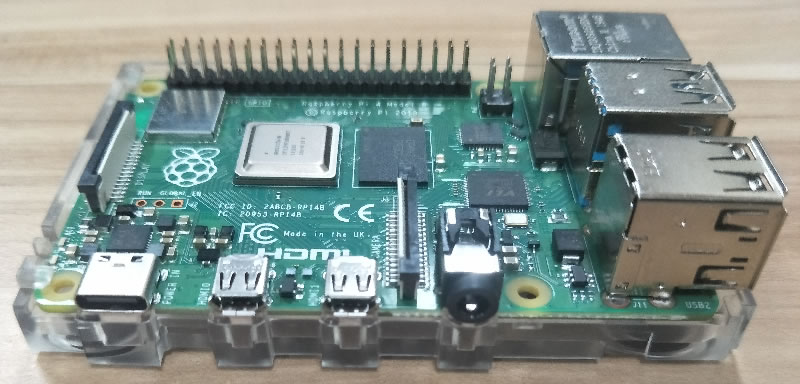
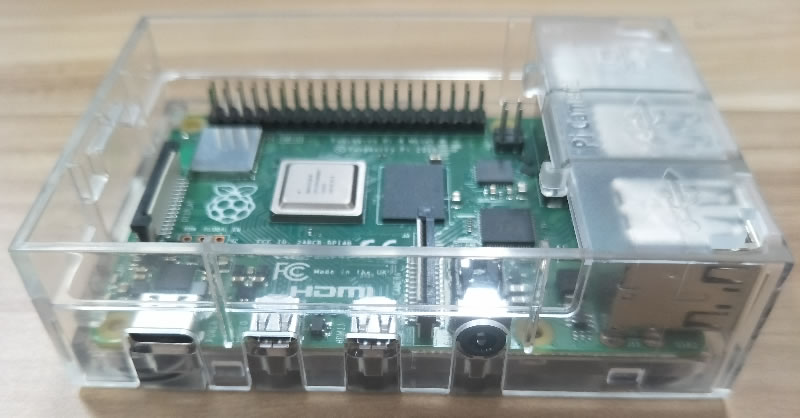
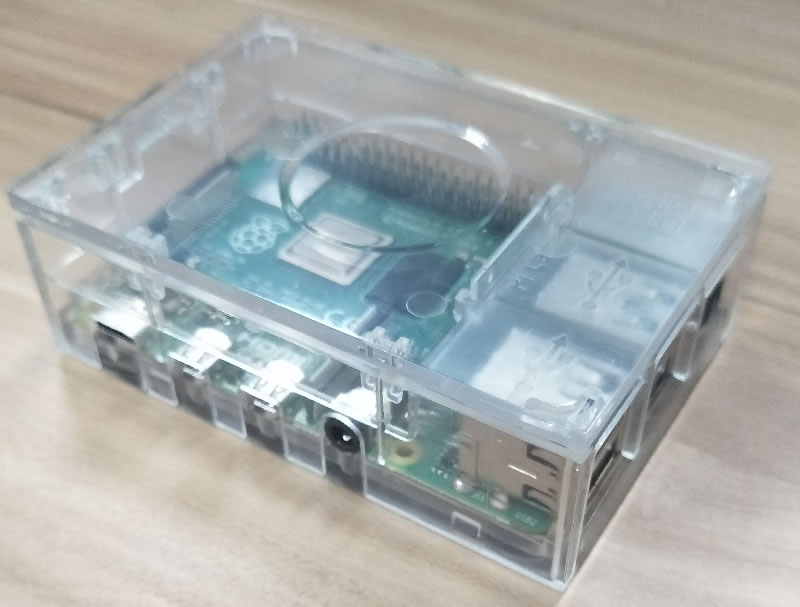
Home Station A Assembly
The clear case has three acrylic parts which can be easily assembled without tools.
![]()
Case Size: 30x62x93mm
Case Material: ABS
Case Features:
- Clear see through plastic for status lights
- Two screw mount holes for wall mounting
- Four rubber feet for desk top
- Position for optional pi camera
- Access to all ports and pins
- Ventilated base and top rim
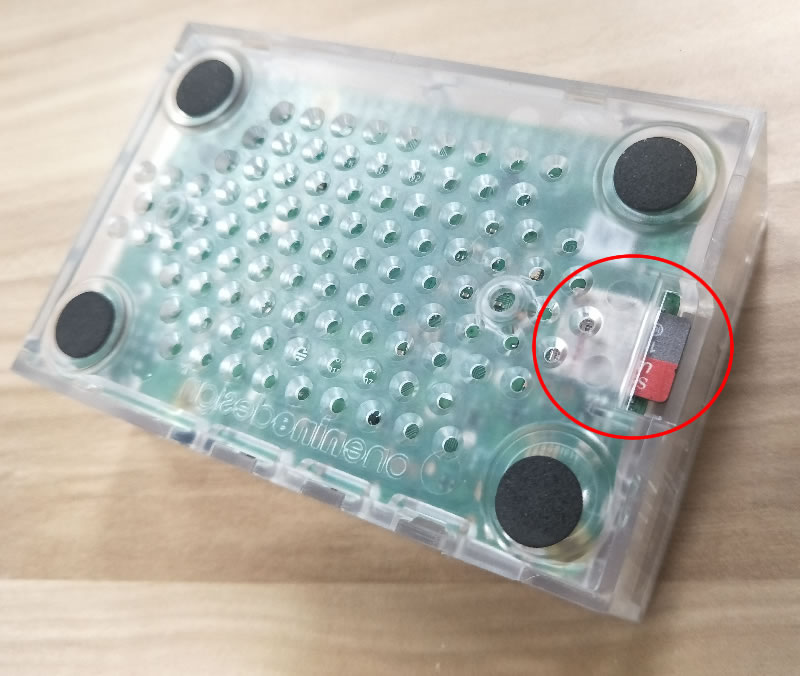
STEPS
-
Attach the Raspberry Pi 4 to the bottom part of the case. Do not insert the Micro SD Card until the case is fully assembled.
-
Gently put the clear case body until it is clicked to the clear case bottom.
-
Place the lid. There is only one correct way to put the lid and do not press it hard.
-
Flip the case to the bottom and insert the Micro SD Card.
Home Station A Reliability
How reliable is the Home Station? Very, as shown in the example below:
We have deployed two of these Home Stations as part of an Australian solution (against a 50 times more expensive solution from overseas car park gaint Skidata) in a commerical car park in Sydney CBD.
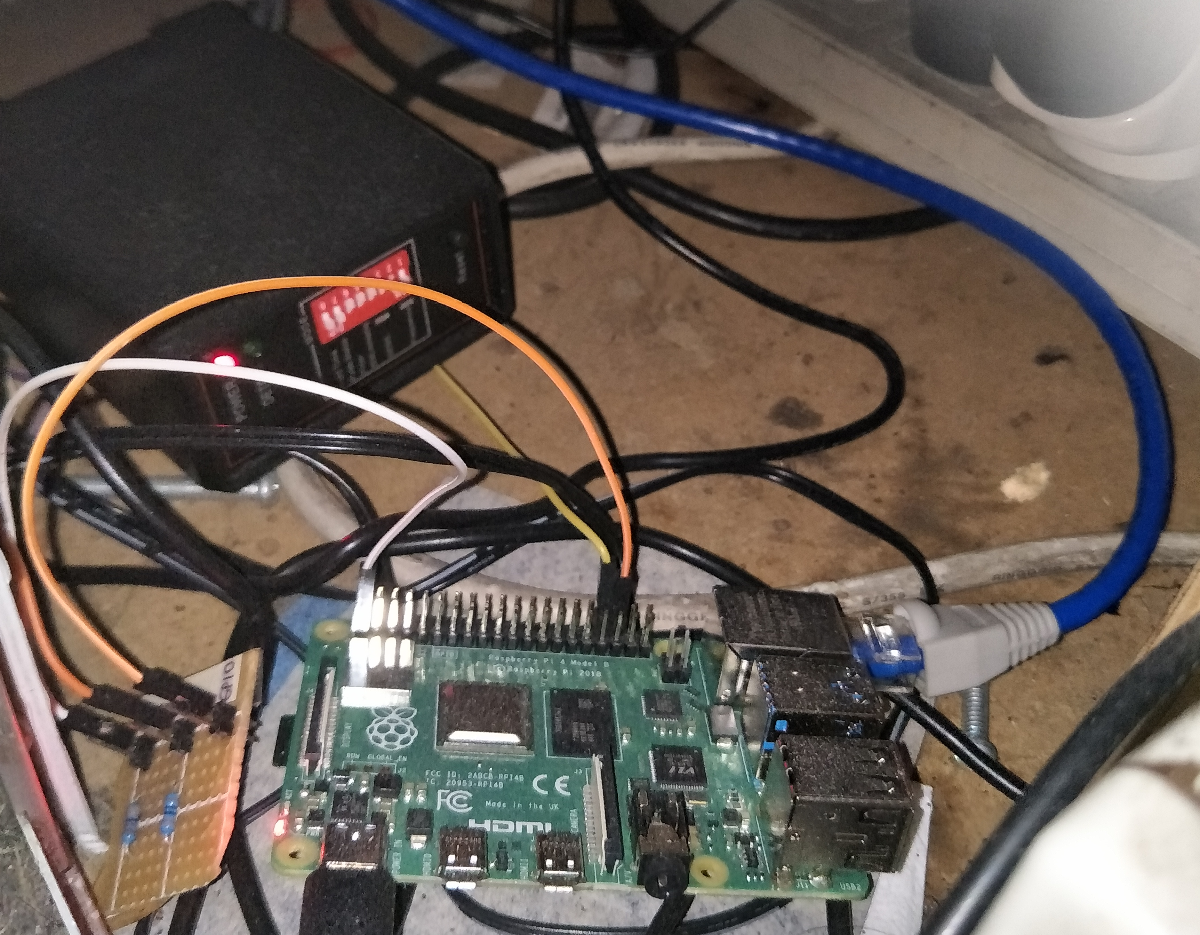
They have been working flawlessly 24×7 since April 2019 detecting incoming and outgoing cars, as part of a ticketless automatic number plate recognition system.
Home Station A Heat Management
The Raspberry Pi 4B’s USB Controller Via Labs VL805 can get quite hot, a heatsink is highly recommended when the USB ports are used.
The area of the VL805 chip is approx. 9mmx9mm
We will be attaching a 8.5mmx8.5mm heatsink to it (V2016B):
http://www.assmann-wsw.com/uploads/datasheets/ASS_0874_HS.pdf
We will be attaching heatsink to it using 8mmx8mm thermo pad (3M 8805 SQUARE-8MM-500):
https://multimedia.3m.com/mws/media/122119O/3m-thermally-conductive-adhesive-transfer-tapes-8800-series.pdf
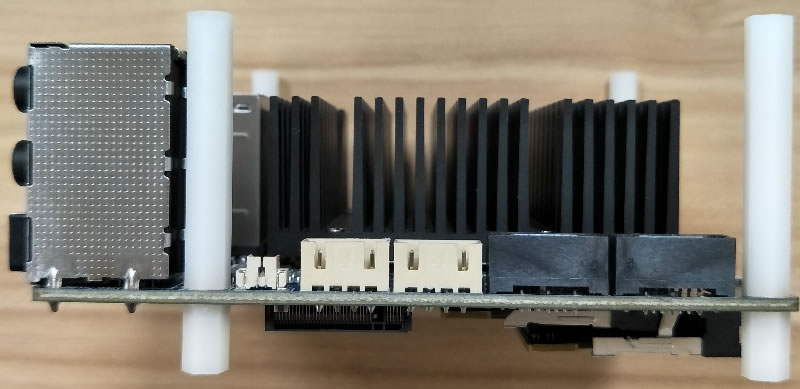
Home Station C
The package contains two boxes which is delivered using Australia Post. Please place all components on an anti static mat and ground yourself, e.g: using an anti static wrist strap.
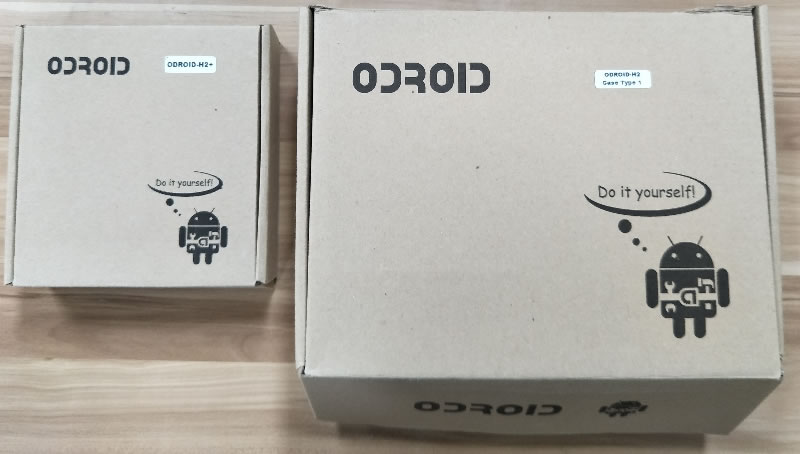
Home Station C Components
All components needed to build the Community Station are in the two boxes.
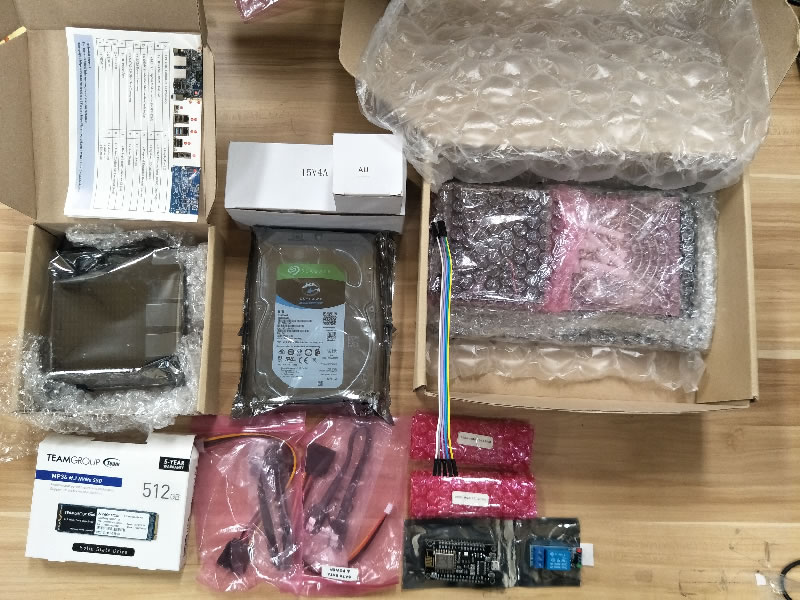
- Case and Fan
- Motherboard
- RAM (2 x 16GB)
- Hard Disk Drive (6TB)
- NVMe (512G)
- NodeMCU and Relay
- RTC Battery
- SATA Data and Power Cables
- SSD Bracket
- Header Wires
- Power Supply
Home Station C Assembly
Please place all components on an anti static mat and ground yourself, e.g: using an anti static wrist strap
1.The case.
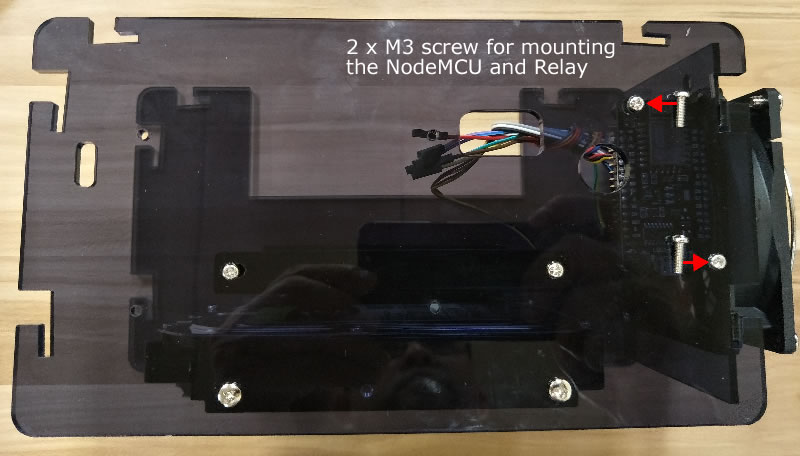
Two M4 size holes are needed to mount the NodeMCU and Relay. Remove the protective plastic coating before drilling.
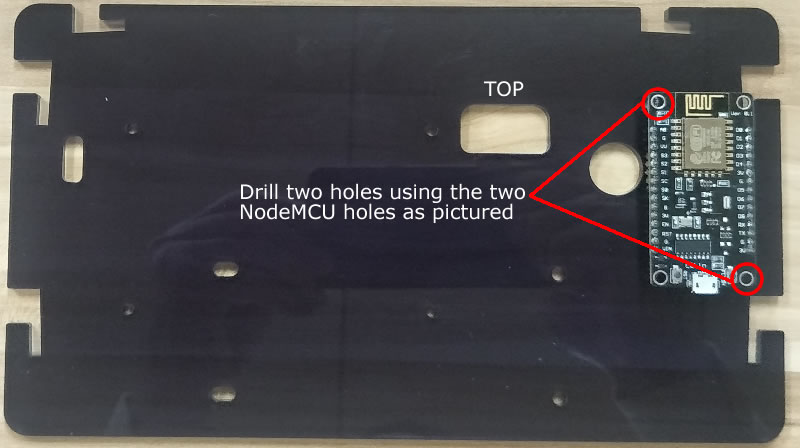
Two new holes drilled.

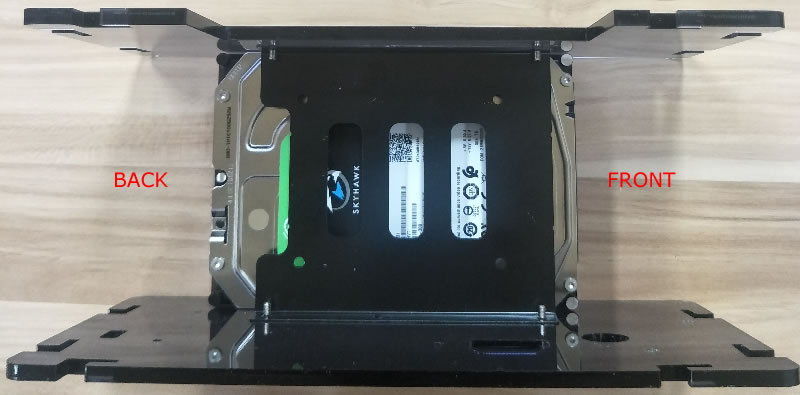
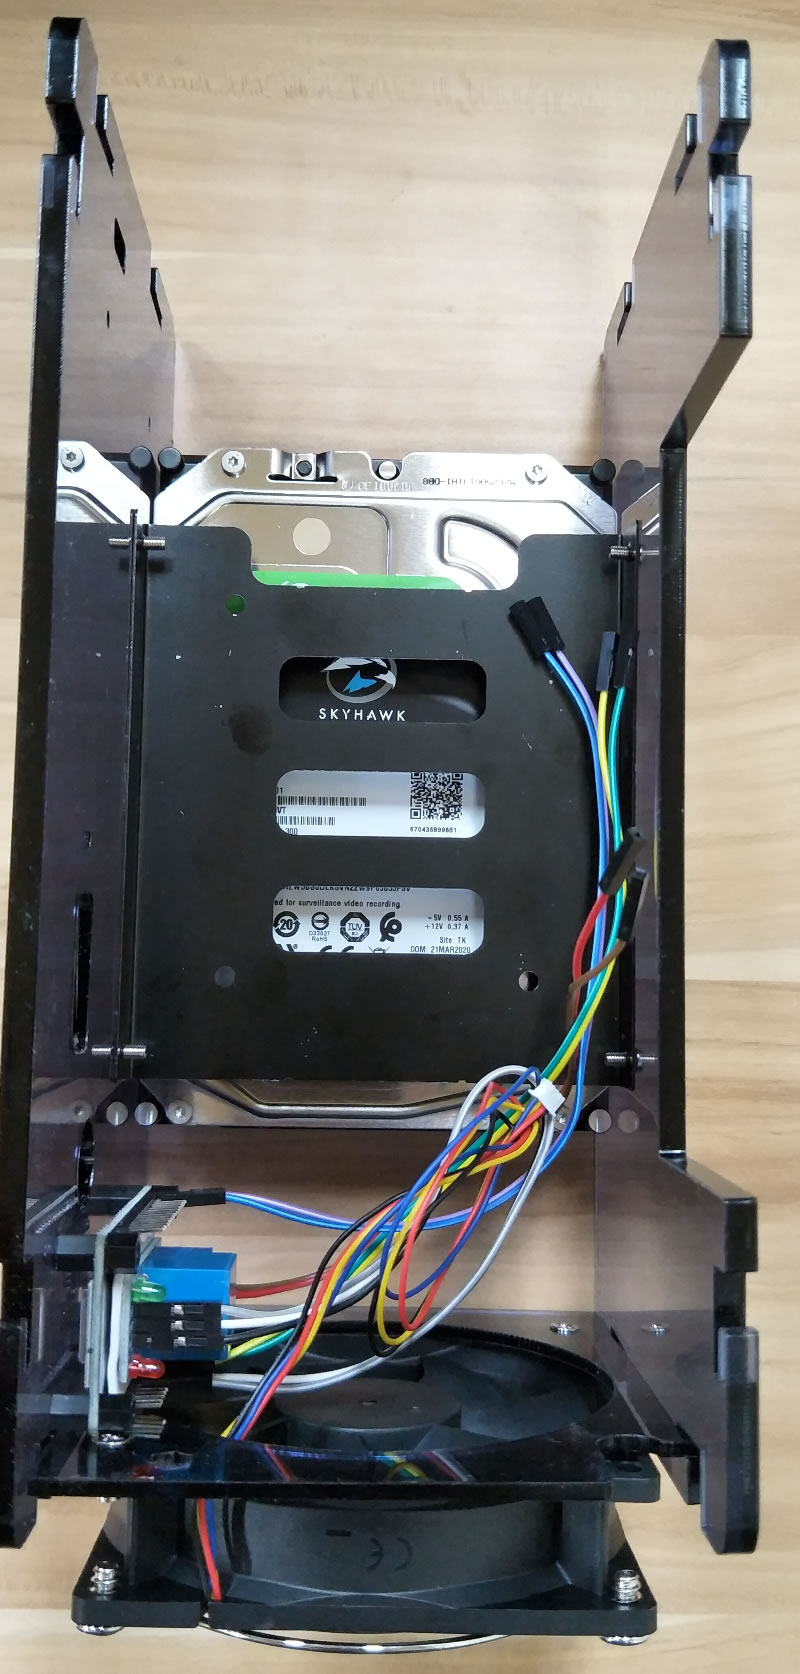
2.Hard Drive and 3.5" SSD bracket.
Using two screws on each side to install the HDD and 3.5" SSD bracket. The four screws for the 3.5" SSD bracket are M3 type, smaller and shorter than the four screws for the HDD.
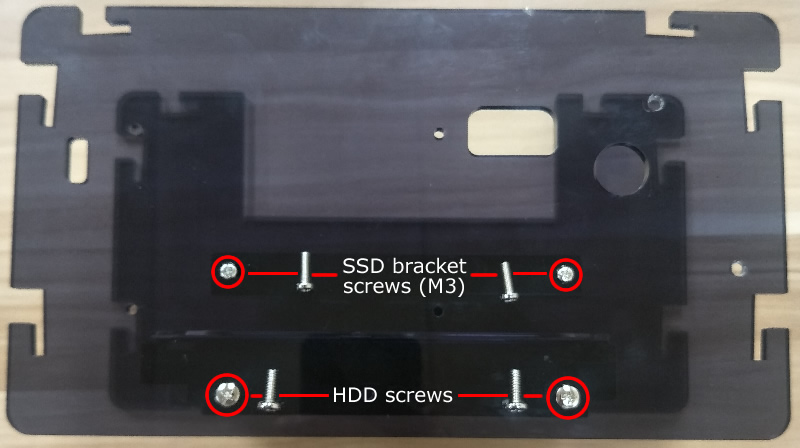
Please make sure the two acrylic sides have the same orientation.
3.The fan.
The fan grill is installed on this side of the fan.
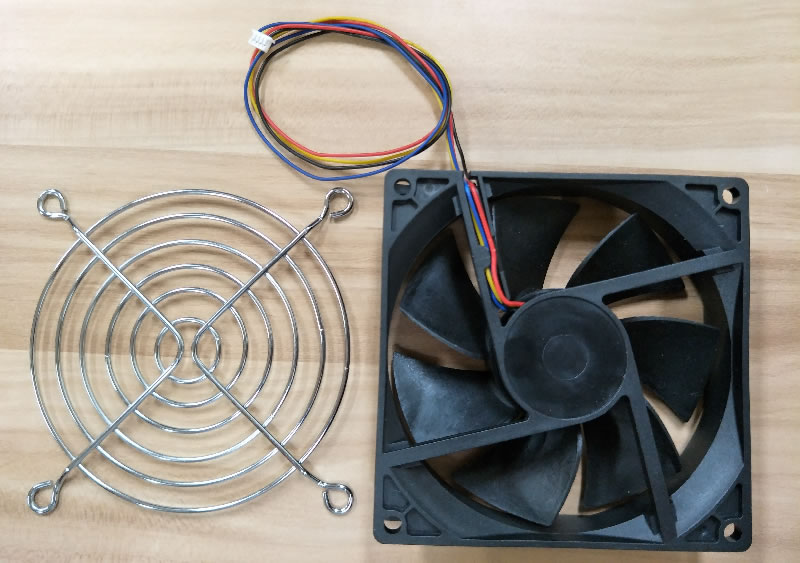
Using three screws, attached the grill to the fan.
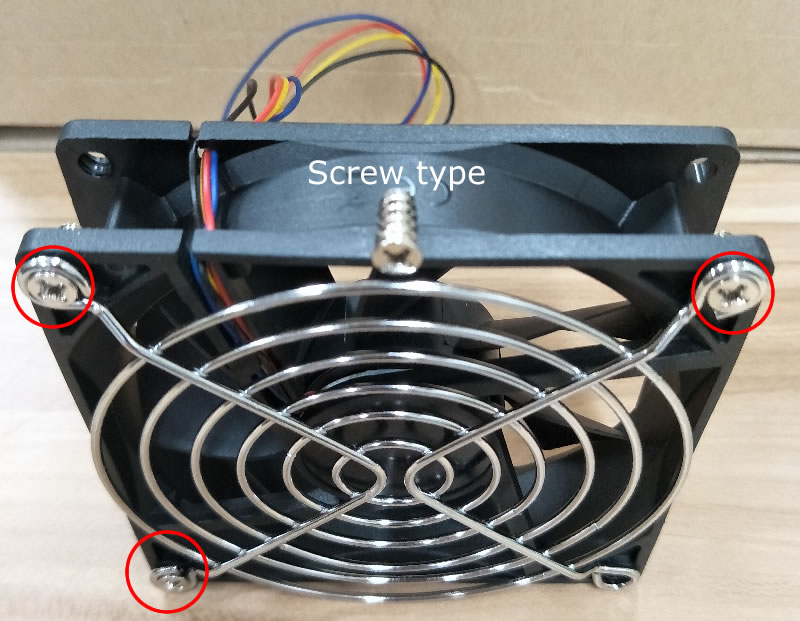
Using two screws, attached the fan acrylic backing to the fan. Remove the protective plastic coating before attaching it to the fan and pay attention to the orientation.
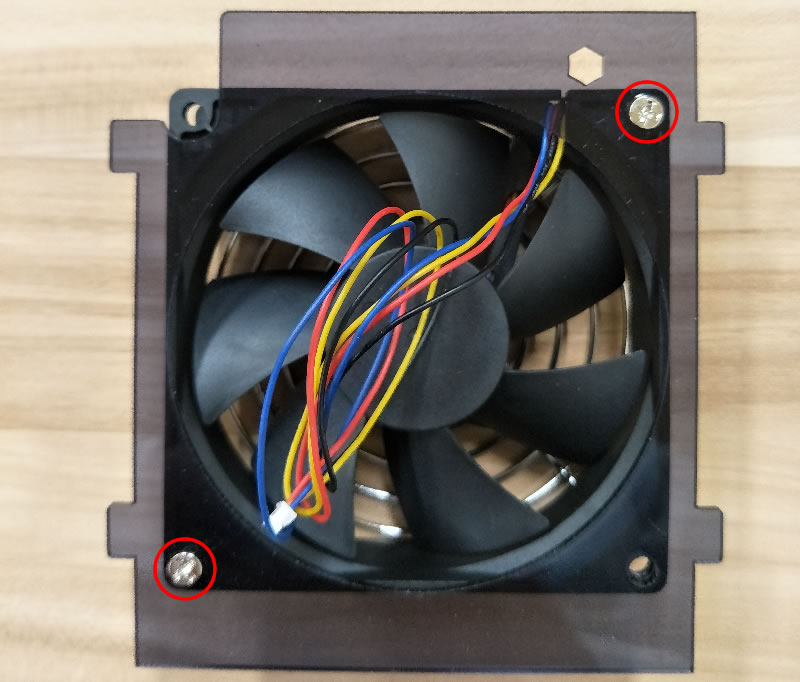
Slide the fan backing so it is securely attached to the front side of the long acrylic sheets used by the HDD and 3.5" SSD bracket.
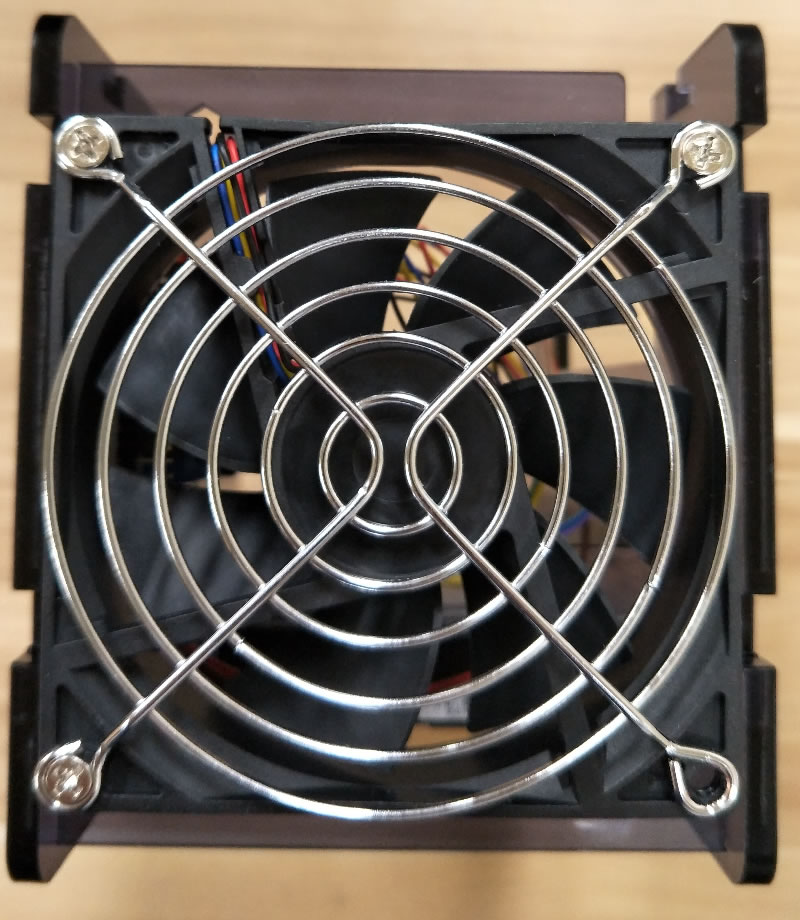
This is the top view.
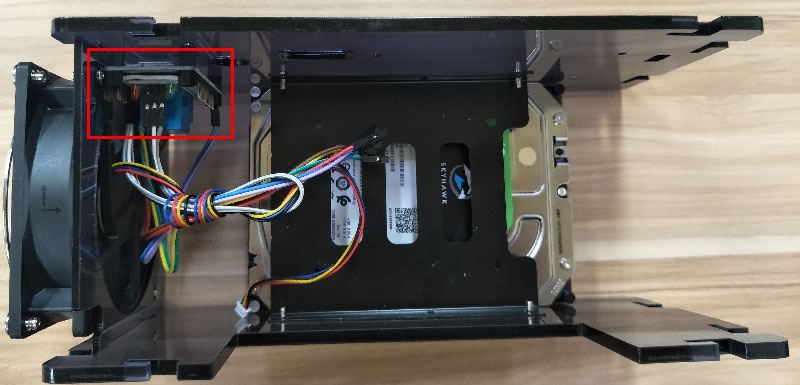
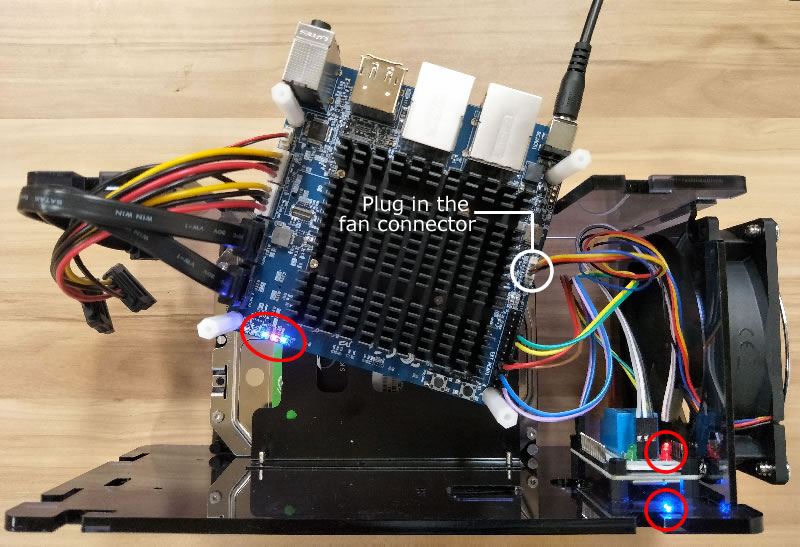
4.The NodeMCU and Relay.
Attached the NodeMCU and Relay using a double side permanent tape. Pay attention to the orientation of the NodeMCU and the Relay.
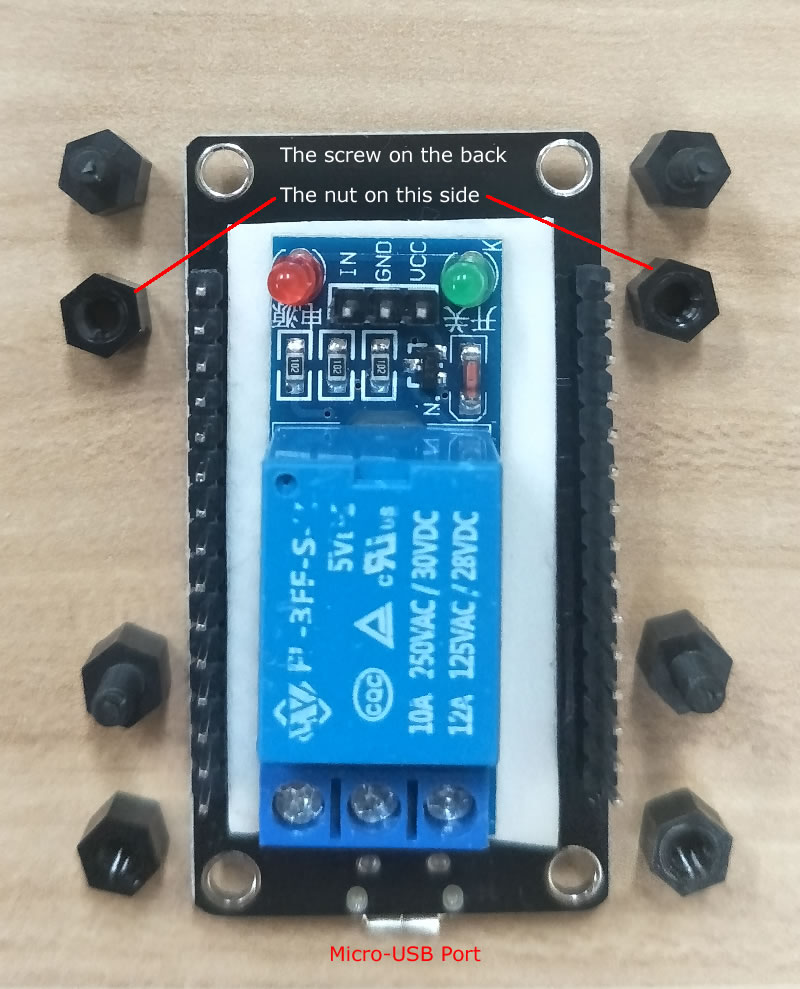
Plug in the header wires to the correct pins.
Mount the NodeMCU and Relay using two M3 screws
Pay attention the the NodeMCU orientation where the antenna of the NodeMCU is away from the 3.5" SSD bracket (top) and the Male to Female header wires connected to the Relay are close to the 3.5" SSD bracket.
5.Motherboard
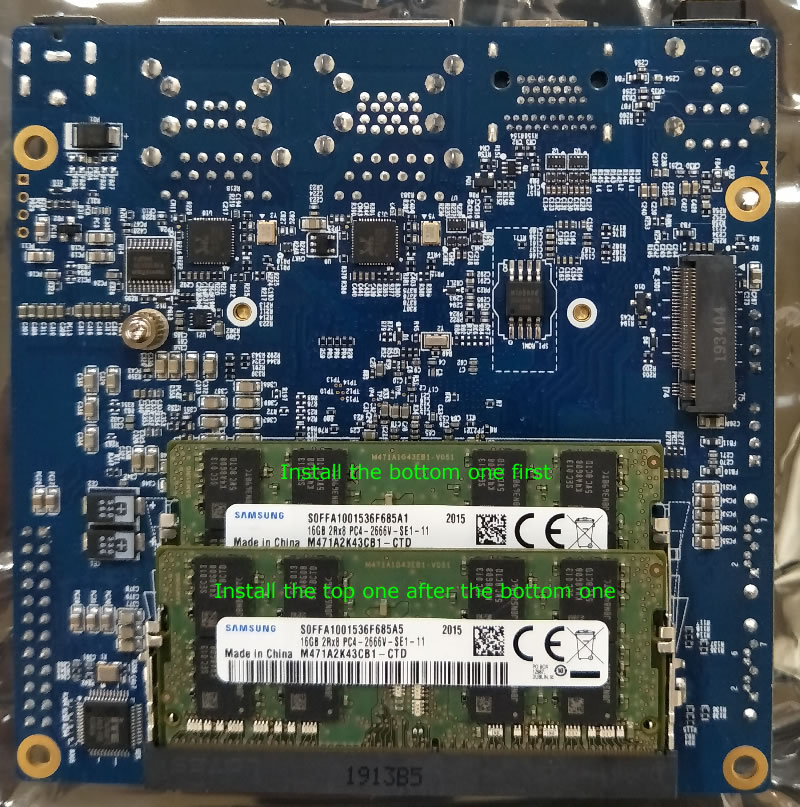
Install one RAM stick to the bottom memory bank first, before installing the another RAM stick to the top one. There is only one correct way to install them.
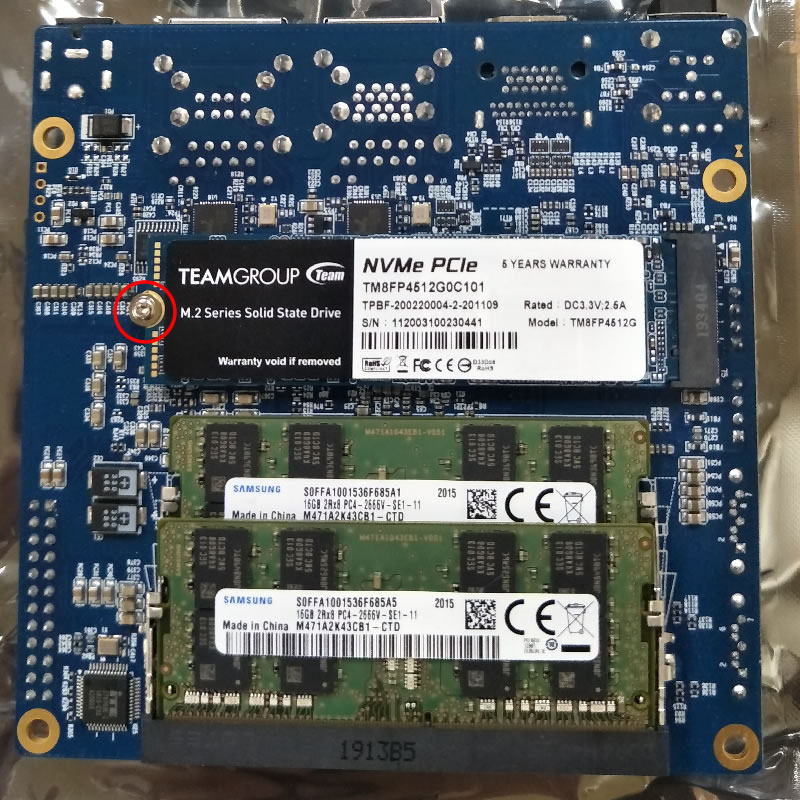
Remove the screw as pictured below before installing the NVMe. There is only one correct way to install it.
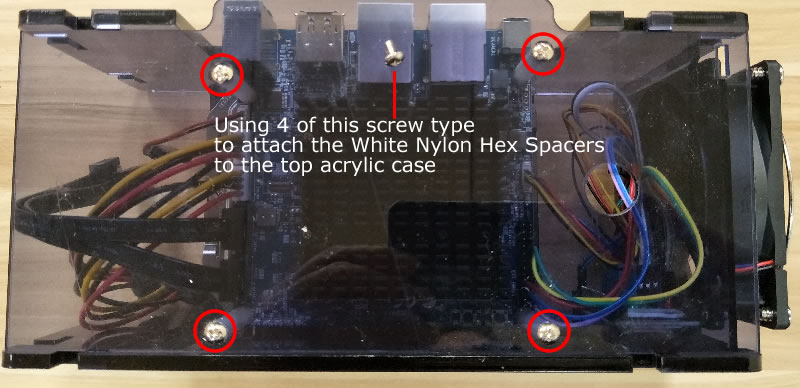
Install the White Nylon Hex Spacers and Screw Nut Stand-off
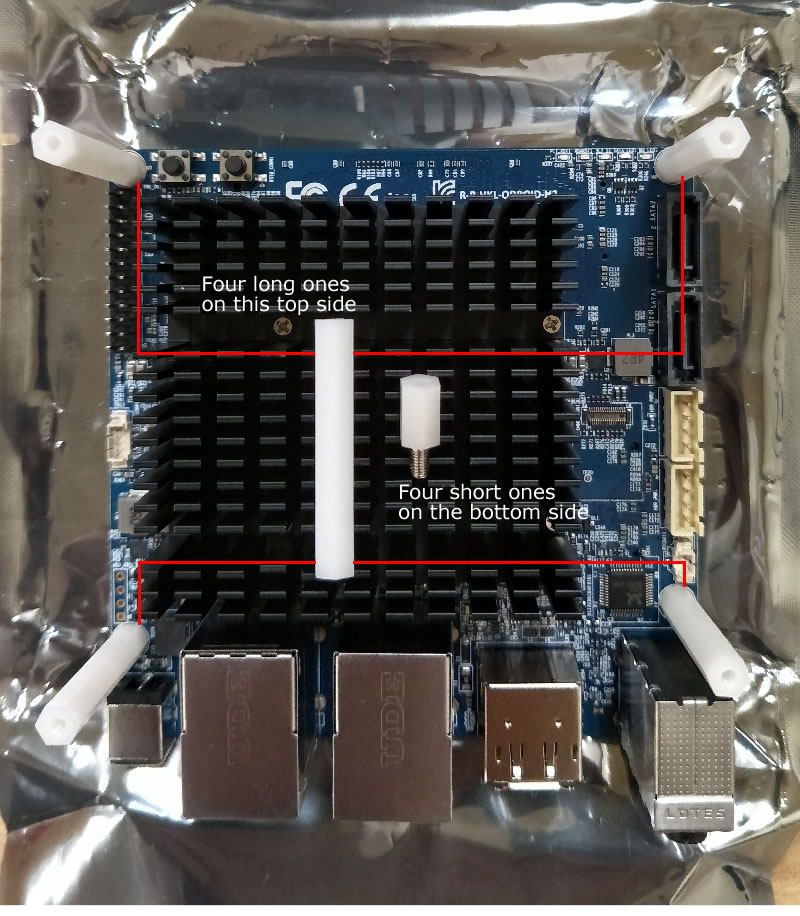
Tighten all the spacers and nuts.
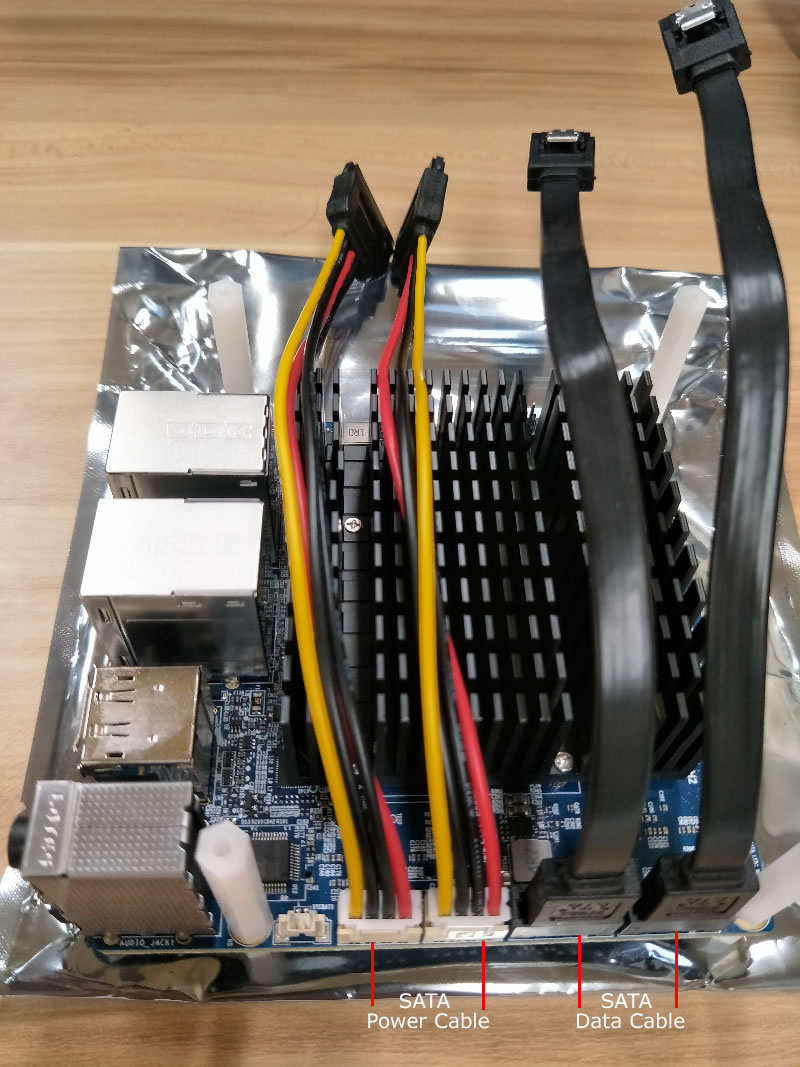
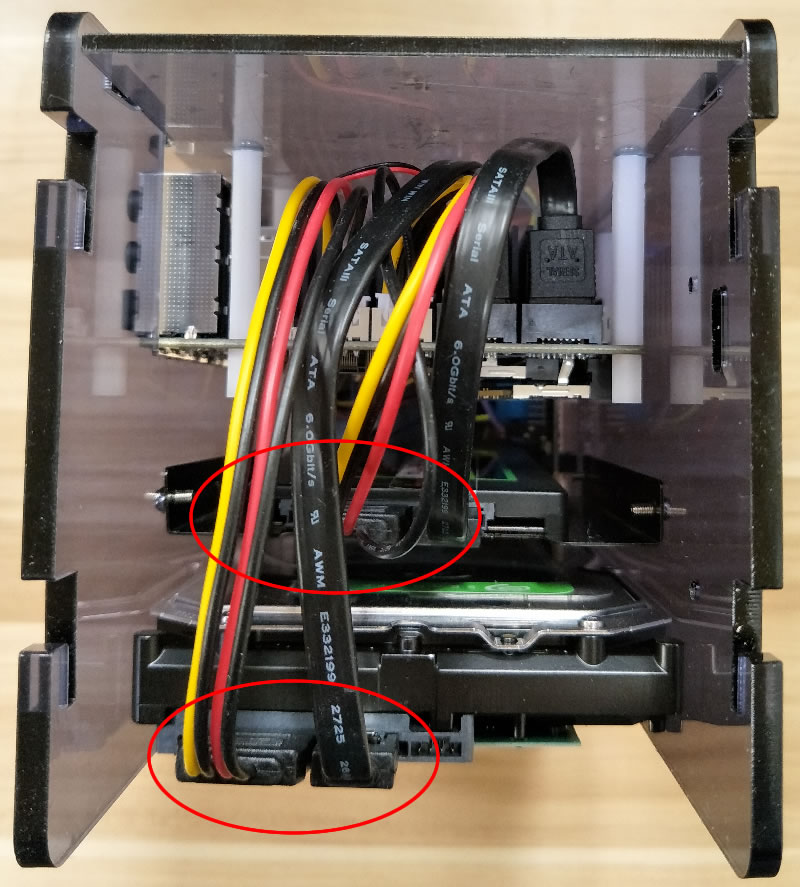
Plug in the SATA data and power cables. There is only one correct way to plug in both data and power cables.
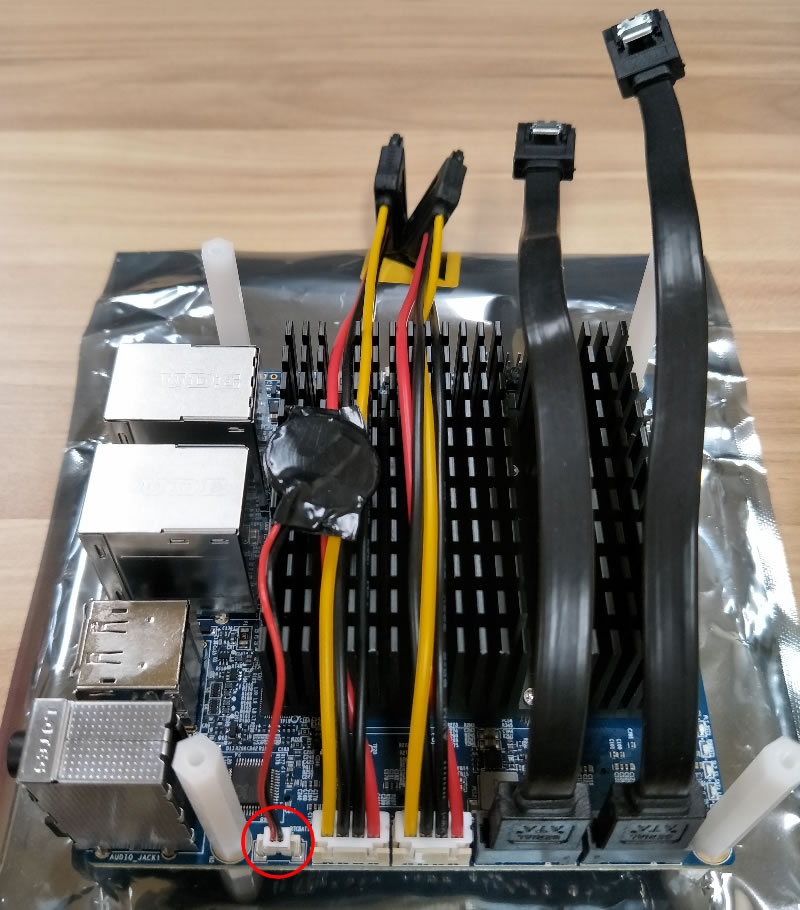
Plug in the RTC battery. There is only one correct way to plug it in.
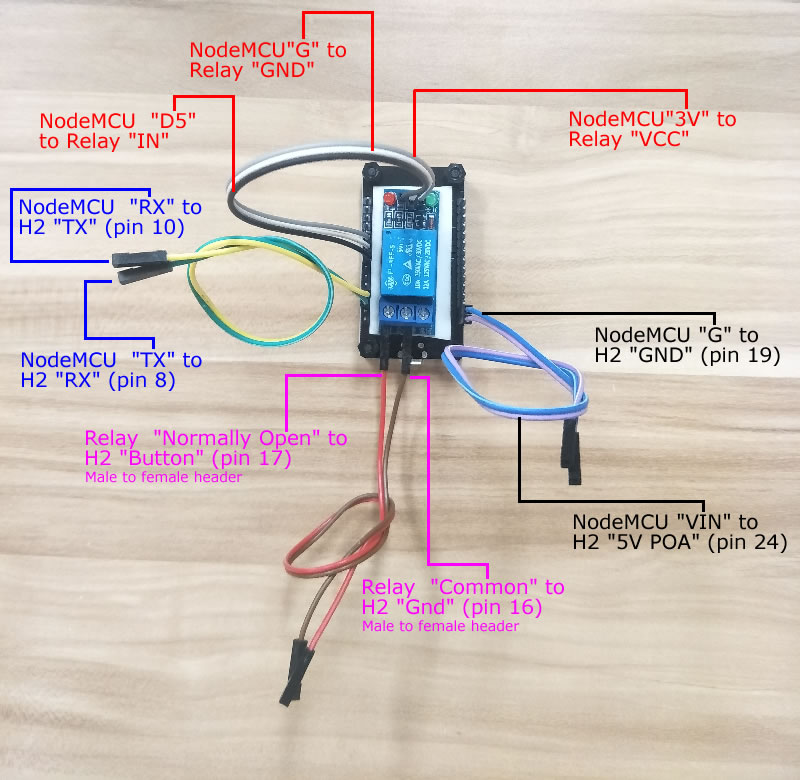
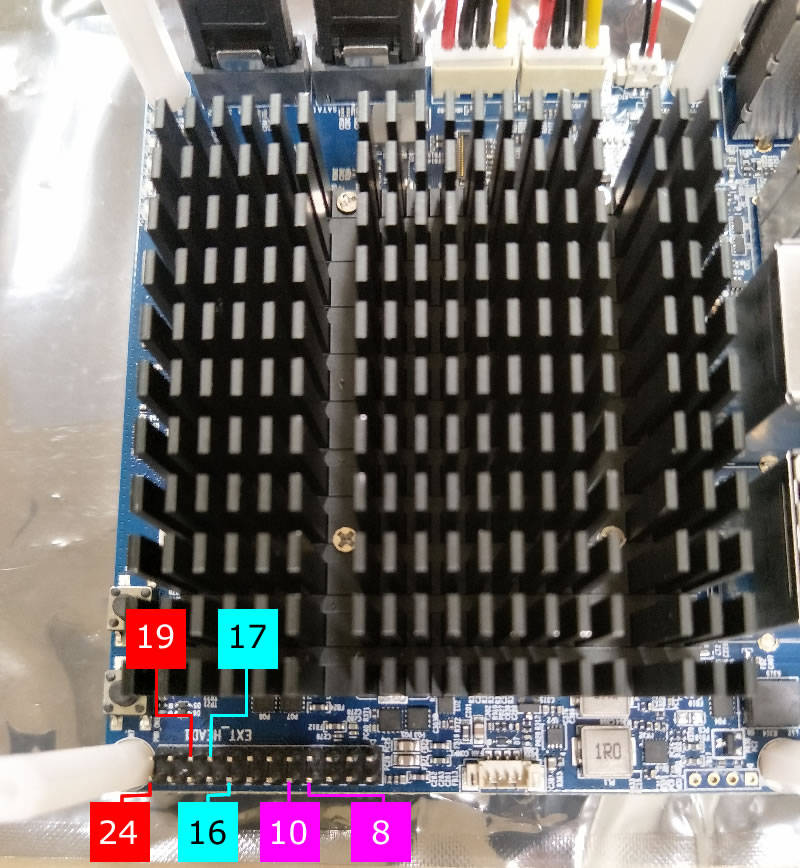
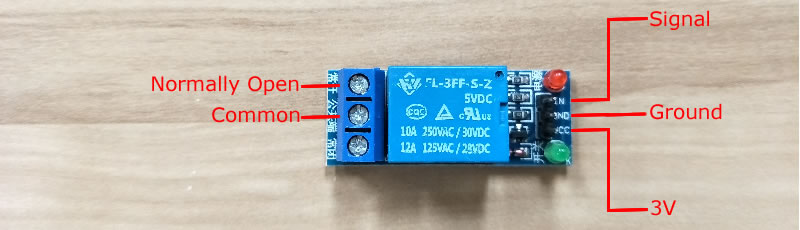
Connect 6 header pins on the motherboard to the NodeMCU and Relay
| H2 | NodeMCU | Relay | Optional | Wire |
| pin24 (5v poa) | VIN (blue star) | female to female | ||
| pin19 (gnd) | G (blue star) | female to female | ||
| pin10 (uart1_tx) | RX (green star) | female to female | ||
| pin8 (uart1_rx) | TX (green star) | |||
| 3V (red star) | vcc | female to female | ||
| G (red star) | gnd | female to female | ||
| D5 – gpio14 (red star) | signal (in) | female to female | ||
| D7 – gpio13 | serial led | |||
| pin17 (button) | normally open | female to male | ||
| pin16 (gnd) | common | female to fema |
The header pin outs on the motherboard.
The NodeMCU header pin outs.
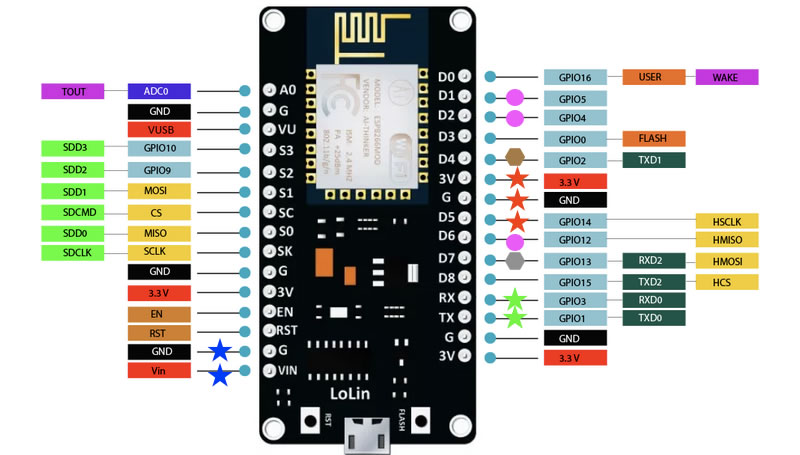
The Relay header pin outs.
After connecting the header pins, plug in the fan connector to the fan socket on the motherboard. There is only one correct way of plugging the fan connector to the fan socket.
If the header pins wiring is correct, the leds on the Odroid motherboard, the NodeMCU and the Relay will be on.
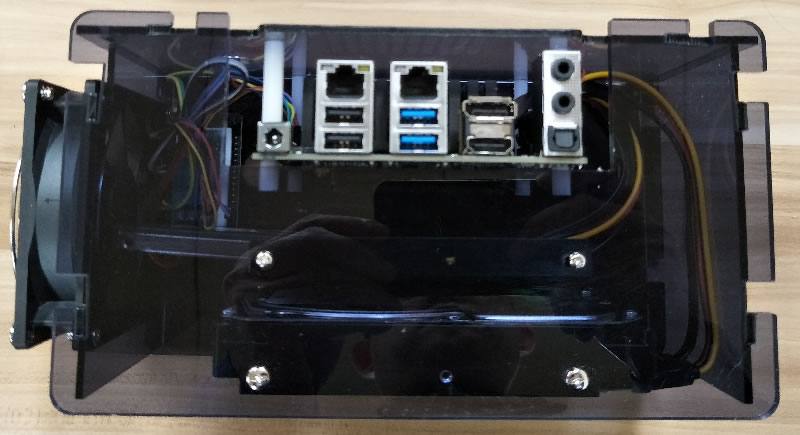
Attach the top case using 4 screws. Remove the protective plastic coating before putting the screws in.
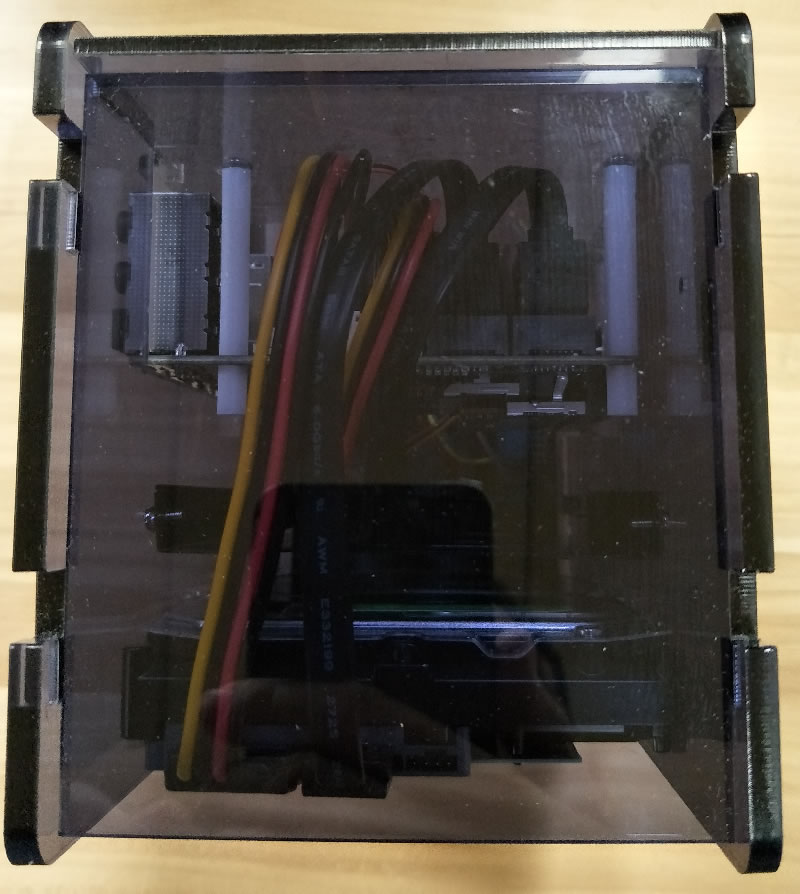
Attach the SATA Data and Power cables to the SSD (if installed) and the HDD.
Put the back cover by lifting the top cover a bit so the back cover can be slided in.
Congratulations! The Community Station is ready to be shipped out. Any question, please email support@oztell.com.
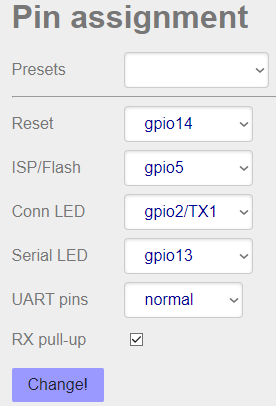
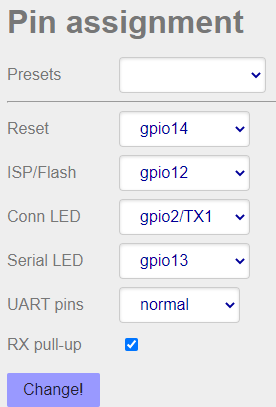
How to remotely control the power using esp-link
- SET UP RESET PIN
DEFINE where power button wire is connected
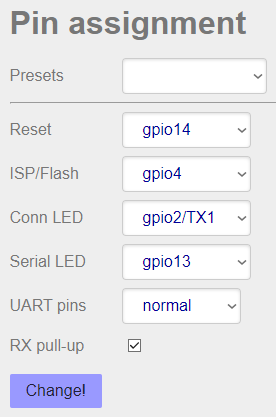
1.1 Go to "Home" page – change "Reset" to gpio14
1.2 Stay on Home page – click on "Change!"
- GRACEFUL SHUTDOWN
SHORT power button press of 10ms
2.1 Go to "Home" page – change "ISP/Flash" to gpio12
2.2 Stay on "Home" page – click on "Change!"
2.3 Go to "uC Console" page – press Reset uC
- HARD RESET
LONG power button press of any duration
Press button DOWN
3.1 Go to "Home" page – change "ISP/Flash" to gpio4
3.2 Stay on "Home" page – click on "Change!"
3.3 Go to "uC Console" page – press Reset uC
Wait for at least 4 seconds (some equipment need more
that 10 seconds).
Release button UP
3.4 Go to "Home" page – change "ISP/Flash" to gpio5
3.5 Stay on "Home" page – click on "Change!"
3.6 Go to "uC Console" page – press "Reset uC"